Uncategorized
The ROI of Home Renovations in Minnesota: What to Expect
Deciding to renovate your home is an investment, other than the immediate benefits are there other things to consider as ROI of home renovations?
Follow along through this blog post to see if the renovations you had in mind, might be beneficial when it comes time to sell.
Deciding to renovate
The first step in this whole decision process is to decide if renovating is something you even want and can afford.
Do you want to renovate?
You’re here for some reason, so renovation has at least been on your mind lately. Whether it’s your kitchen, bathroom, basement or other areas of your house, getting a return on your investment or ROI on home renovations is something to consider. If renovating is on your mind and something you plan on doing no matter what, knowing about your ROI may be a helpful tool.
Why are you renovating?
If you’re thinking about renovations in your long term or “forever” home, the ROI of home renovations for you will look different than someone who is looking to fix something that has been bothersome in an attempt to sell their home for more. Moving forward in this post we will talk about personal ROI and monetary ROI.
Personal ROI
You bump into the same cabinet every single time you go around a corner. You wish to be able to use your basement for recreation or living and not have it be a cold cement space. You want to entertain but the three feet of task space makes cooking for more than three people really hard. You hate the color in your bathroom or wish the shower was bigger.
The list of reasons to renovate parts of your home for personal ROI could go on and on. It’s hard to quantify just how much ROI your home renovations will give you. But to go off the list above, you could widen a hallway or move a bank of cabinets to ensure that there is adequate space for moving around. Finishing your basement usually doubles your livable space in your house. So finishing your basement is a little more quantifiable, because you get double the square footage, usually another bathroom, more living space or bedrooms. This one is also great because it fits into monetary ROI too. Great designers and contractors can give your more tasking space in your kitchen without knocking down walls, moving plumbing, or generally change too much about your kitchen, keeping your costs lower than you may expect while giving you more space.
Monetary ROI
When thinking about monetary ROI on home renovations, thinking about the problems is going to be more practical than the desires. Remodeling and renovations can absolutely boost the sale price of your house. Just make sure to be strategic about where you spend your money, or it may not matter in the long run.
One thing to consider when thinking about renovating your home with the idea to sell is your market. The likelihood of selling your home hundreds of thousands of dollars above the average price in your area just because you did $100,000 in renovations is super low. Recently a homeowner tried to sell their home for $100,000 over the average home value in their neighborhood because they had put about $75,000 worth of renovations into their home. These renovations included a deck, major landscaping, a partially finished basement, solar panels, and minor cosmetic upgrades inside the home. What they didn’t account for was, their neighborhood heavily catered to young and growing families. With only two bedrooms and two bathrooms, this house was not renovated for a family to use. The deck certainly adds value, but a family would have much rather had more bedrooms than extensive landscaping. Or a fenced in yard over solar panels.
I told that story in Monetary ROI because they definitely made the renovations they did for themselves, or Personal ROI, but they expected Monetary ROI. They did not sell the home, and are still living there enjoying the renovations they made, but they didn’t see the ROI on renovations that they had hoped to.
People that will see Monetary ROI on renovations are people who use those renovations to solve a big problem. According to the Remodeling 2023 Cost vs. Value Report (www.costvsvalue.com) the renovation with the highest ROI in the Midwest in 2023 was HVAC conversion to electrical. Followed by siding replacement, vinyl, and the addition or replacement of manufactured stone veneer. Check out that link for the full report and to see where your highest ROI could come from.
Better left to Personal ROI
Here is a list of awesome renovations that may leave you feeling a little better if you do them for you, than for your homes next owners, according to Cost Vs. Value
- Major Kitchen Remodel
- Upscale Primary Suite Addition
- Upscale Bathroom Addition
- Upscale Bathroom Remodel
- Sunroom Addition
- Swimming Pool Addition
- Home Theater Addition
The Top 5 Signs Your Home Needs a Makeover
Your home is more than just a place to live; it’s a reflection of your personality, style, and comfort. Over time, however, even the most well-loved homes may start to show signs of wear and tear. In this blog post, we’ll explore the top five signs that indicate your home is in need of a makeover. Whether it’s outdated design, lack of functionality, or visible wear and tear, recognizing these signs early can help you embark on a transformative renovation journey to breathe new life into your space.
Outdated Design and Décor:
The impact of outdated design and décor can be keenly felt. Homes with outdated elements often exude a sense of staleness and lack of inspiration, diminishing the overall atmosphere and appeal. From the charm of Victorian-era dwellings to the sleek lines of contemporary abodes, the aesthetic evolution of homes in Minnesota reflects changing tastes and lifestyles. Signs of outdated design are prevalent, from old-fashioned wallpaper adorning the walls to worn-out furniture that has seen better days, and faded paint colors that have lost their vibrancy over time.
However, amidst the sea of outdated design lies an opportunity for transformation and revitalization. Modern design trends offer a breath of fresh air, infusing homes with renewed vitality and contemporary flair. In Minnesota, homeowners can embrace Scandinavian-inspired minimalism with clean lines and natural materials, or opt for the cozy warmth of hygge-inspired interiors with soft textures and neutral tones. Alternatively, they may choose to incorporate elements of industrial chic, with exposed brick and metal accents adding an edgy sophistication to their living spaces. By embracing these modern design trends, homeowners can breathe new life into their homes, creating spaces that feel current, inviting, and reflective of their personal style.
Lack of Functionality:
The importance of a well-designed living space cannot be overstated. Functionality is the cornerstone of a harmonious home, influencing every aspect of daily living from morning routines to evening relaxation. Yet, when functionality is compromised, the impact on residents’ quality of life becomes palpable. Signs of a lack of functionality manifest in various forms, from cramped living spaces that inhibit movement and flow, to insufficient storage solutions that lead to clutter and disorganization. Inefficient layouts exacerbate these challenges, hindering homeowners from fully enjoying and utilizing their living spaces to their fullest potential.
Fortunately, for Minnesota homeowners seeking to restore functionality to their dwellings, a myriad of renovation solutions awaits. From room expansions to storage solutions and layout redesigns, the possibilities for improving functionality are endless. Room expansions offer additional square footage to alleviate cramped quarters and provide breathing room for occupants. Thoughtfully designed storage solutions, such as built-in cabinets, shelving units, and closet organizers, optimize space and promote organization. Meanwhile, layout redesigns can reconfigure existing spaces to enhance flow and usability, ensuring that every corner of the home is both functional and inviting. Through these renovation projects, Minnesota homeowners can transform their living spaces into efficient, well-appointed sanctuaries that cater to their lifestyle needs.
Visible Signs of Wear and Tear:
Visible signs of wear and tear can cast a shadow over the beauty and charm of these dwellings. These telltale signs not only detract from the overall appearance of the home but can also diminish its value and curb appeal. From chipped paint on exterior siding to cracked tiles in the kitchen or bathroom, these imperfections serve as reminders of neglect and deferred maintenance. Additionally, water damage, whether from leaky roofs or faulty plumbing, can wreak havoc on a home’s structural integrity and aesthetic appeal, further exacerbating the problem.
Recognizing the importance of maintaining a home’s integrity, Minnesota homeowners are urged to address visible signs of wear and tear promptly. By taking proactive measures to address these issues, homeowners can prevent further deterioration and safeguard their investment. Whether through repainting exterior surfaces, replacing damaged tiles, or repairing water-damaged areas, prompt action can restore the home’s appearance and functionality while preserving its value for years to come. With a commitment to regular maintenance and timely repairs, Minnesota homeowners can ensure that their homes remain showcases of beauty, comfort, and durability amidst the changing seasons.
Energy Inefficiency:
Decline in Property Value:
Neglecting maintenance and updates can spell trouble for property values. Over time, homes that suffer from deferred maintenance and outdated features may experience a decline in value, impacting homeowners’ equity and financial well-being. Signs that a home may be losing value include comparable properties selling for more in the neighborhood, as well as a noticeable decrease in curb appeal due to neglected landscaping or exterior upkeep. These indicators serve as red flags for homeowners, signaling the need for proactive measures to protect their investment and preserve their home’s value over time.
However, Minnesota homeowners need not despair, as investing in a home makeover can breathe new life into their dwellings and bolster property values. By undertaking renovation projects that address outdated design elements, enhance functionality, and improve energy efficiency, homeowners can increase their home’s appeal and attract potential buyers in the competitive real estate market. From modernizing interiors with stylish upgrades to enhancing curb appeal with landscaping improvements, a well-executed home makeover can significantly impact a property’s marketability and resale value. By investing in their homes today, Minnesota homeowners can secure a brighter future for themselves and their families, while enjoying the benefits of a beautifully renovated living space.
Conclusion: Recognizing the signs that your home needs a makeover is the first step towards transforming your space into a place you love to call home. Whether it’s updating outdated design, enhancing functionality, or addressing visible wear and tear, a renovation project can breathe new life into your home and increase its value for years to come. Ready to embark on your renovation journey? Contact Satin Touch, Inc. today to get started!
Maximize Your Remodeling Budget
Maximize your remodeling budget with these tips. Making your vision come to life without reconstructing your whole house is what we do. That’s why we say “Homes Reinvented”.
One of the things we specialize in is working to find the best solution for your home, and your budget. The thing is, every project should have a budget, and ‘budget’ isn’t a bad word. A budget is a price guideline to ensure that everyone arrives at the same destination.
A budget can be a few hundred dollars to a hundred thousand. But usually its somewhere much more comfortably in the middle.
What is a remodeling budget?
We all know what a budget is, it involves number and money, but what makes a remodeling budget different? And you can’t maximize your remodeling budget if you don’t have one right?
The budget you plan and set aside for remodeling should take into account multiple factors like:
- What type of project you want done
- What quality of materials you want to include
- Is any of it going to be DIY
- Does plumbing or electrical need to be moved
- What are others being charged in your area
… and so on.

How do I make a remodeling budget?
One of the best ways to put together a budget is to look realistically at what you can spend. Or look at what you can borrow if you plan on a large scale remodel or renovation. Most contractors will have a threshold payment system setup. This is where you pay a deposit of some sort, and then pay pre-determined amounts at other milestones.
Many contractors will offer an estimate where they will come out to your home. They will take measurements, photos, and talk through your vision with you. They then go back to their office and put everything through pricing and estimation systems that factor in all of the things you might not. Schedule your free estimate from Satin Touch today!
(Do waste percentage, 40-yard or 50-yard, tape and mud, or site preparation really mean anything to you? If they do great! But if not, you’re in the right place and hiring a contractor should be on your horizon.)
Having a contractor (or contractors) give you bids will help you get an idea of exactly how much this is going to cost. You should always keep in mind that changes might happen throughout the process, so keeping a little wiggle room in your budget, about 10-15% is recommended for when things come up that could not have been planned for. Once you’ve found a company you like and have a project within your budget, its time to get started.
If you’re wondering how much your kitchen remodeling should cost, the answer isn’t simple. And it’s going to vary state to state, city to city, and even company to company, so my best advice is to get some estimates and shop around a little bit.
And how do we stay within that budget?
If you’re going the DIY route, you will want to make sure you are keeping track of everything you buy and every penny you spend. This will help you ensure that you’re not going over budget, as well as having a carefully thought out plan. The other thing you will want to do with DIY remodeling projects is to plan to go over budget, and build that in. So earlier I mentioned 10-15%, but going the DIY route means you should follow the
If that sounds like a lot of work that you’re not interested in, hiring a contractor who does all of that for you is a great option. It is quite literally their job to make sure things stay within budget for you and for them, plus they organize all of the appointments, inspections, and other mundane but important aspects of a great remodel. Maximizing your remodeling budget starts with having and keeping within your budget to begin with.
I came here to read about maximizing my budget though, how do I do that?
There are many ways to maximize your remodeling budget, and here at Satin Touch, it’s one of our favorite things to do, and to talk about so let’s get into it.
Plan your space wisely
When you get the idea that you want to remodel a part of your home, your probably head over to Pinterest, or Google to find some ideas an inspiration. But the likelihood that those spaces look and function just like yours is pretty low. Having inspiration and ideas is great, don’t skip this part! But make sure you are keeping your space in mind. Remember small changes can make a big impact.
In your kitchen try to keeping plumbing and electrical in the same places. Want to move or remove a wall? Are there outlets there that will need to be moved too?
Consider what is really important
Having a list of needs and wants ready to go when you set out is important. These will be different for every project too. One kitchen may need more overhead lighting and want extra counter space. While another might need a different cabinet layout and want more lighting. Your designer and contractor can help you decide which trade offs are worth it, and where it might be the right place to spend the extra money.
Start planning early
It’s never too early to start thinking about your plans. If you want to remodel your kitchen in two years, spend a couple of weeks really paying attention. Look at things that work or could use some updating or ways that you could make your space more efficient for you.
Let’s wrap it up
We talked making a budget, sticking to it, and maximizing your remodeling budget. From space planning to your top priorities and planning you should now have an idea of where to get started with your remodeling budget.
Leave a comment below if you have any questions.
Small Changes-Big Impact: How Doing Small Home Upgrades Can Make A Huge Difference
When it comes to home renovations, even some of the smallest changes can make a huge impact on the look and feel of your home. This means that doing small things like refreshing your paint choice, adding some lighting, or switching out carpet for vinyl planking can make your space feel more beautiful and functional, and have you ready to show it off.
As a home renovation company we do a lot of big changes, sure, but getting to see the absolutely amazing transformations that take shape within budget and a shorter timeline is one of our favorite things to do.
Let’s take a look at some.
Brighten Up Your Space
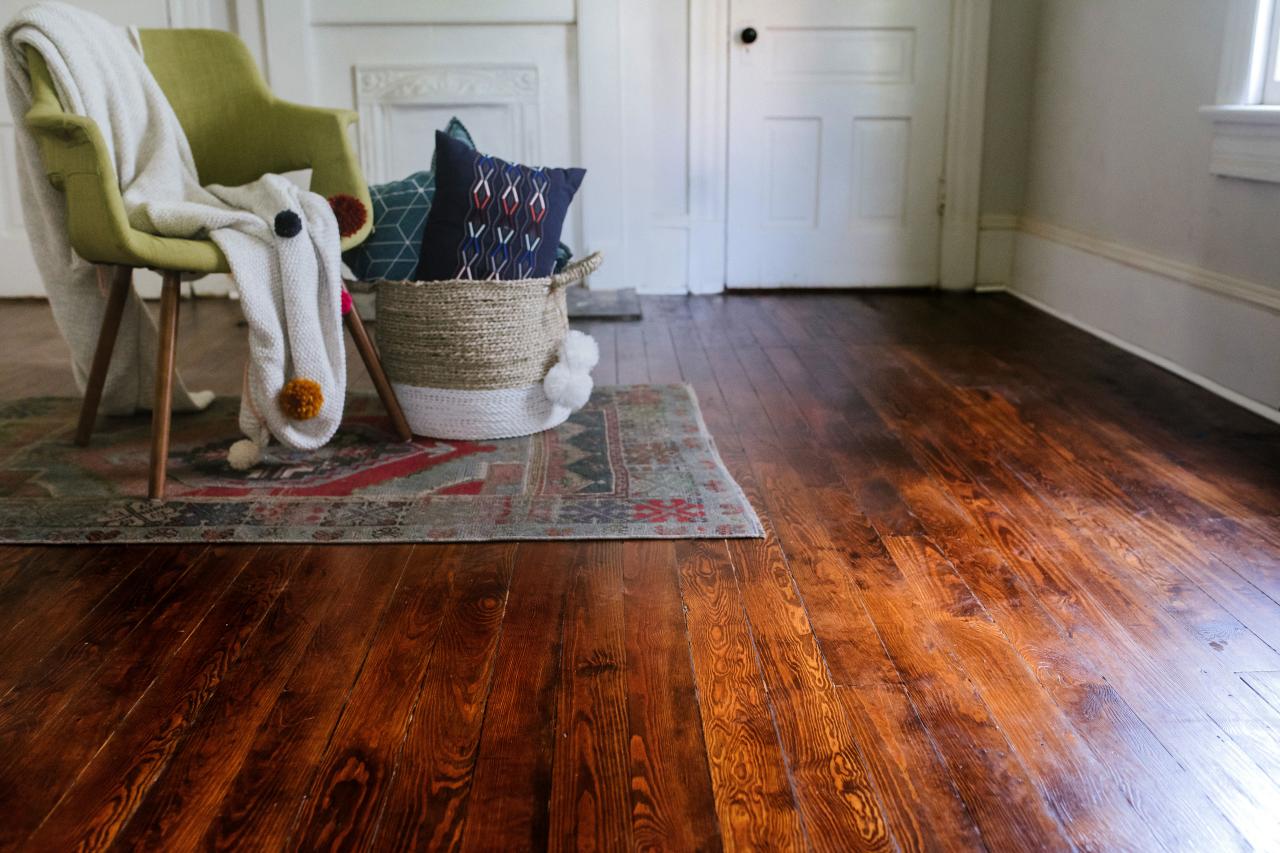
With a new paint color, some overhead lighting, and a gorgeous focal point fireplace some small changes took this living room and made it a welcoming, comfortable place for this family to entertain and spend their evenings. Notice that the couches are the same, the rug is the same, and the window stayed right where it always was. This is what we call Small Changes-Big Impact. Brightening up a room with paint, lighting, and small changes can take a room that previously felt like somewhere you might dread bringing your family and friends, to the new place everyone wants to watch a movie marathon or host a family game night.


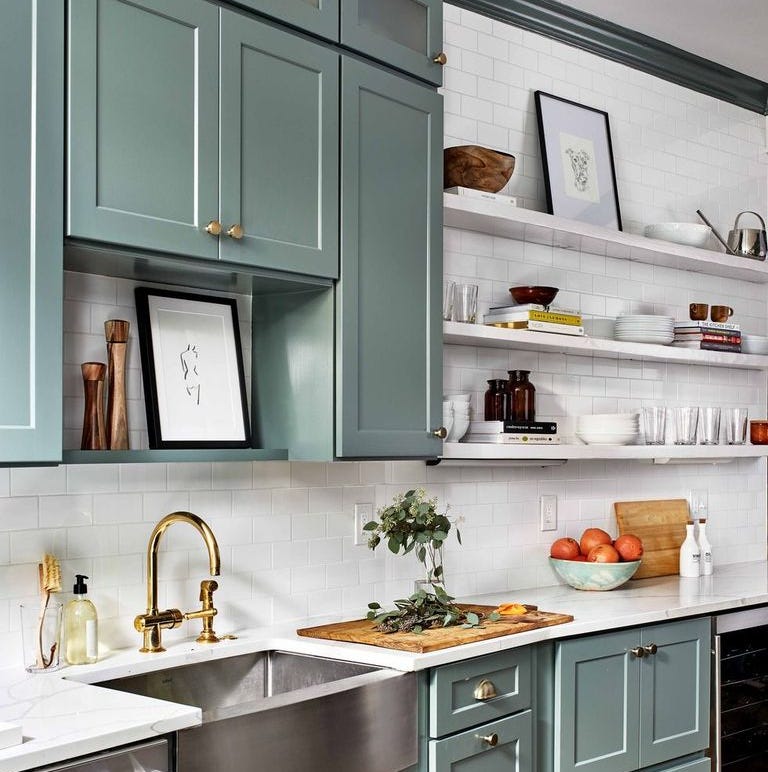
Kitchen Update
I know what you’re thinking, is this even the same kitchen? There’s no way all of this is considered “small changes”!
It may look like tons and tons of work was done on this kitchen to get it to looks just like the homeowners wanted, and to be a more functional space, so let’s break it down.
- 1 wall got removed. Walls like this are often only for separation and really just require getting knocked down (the demolition is the fun part anyway)
- New cabinets – one of the easiest ways to update your kitchen is new or painted cabinets. While these homeowners chose new cabinets, they could have easily gotten a similar look with just some white paint.
- Island to peninsula. It gives more working space in the kitchen and opens the space up for entertaining
- Backsplash change out
- New flooring


But wait those are some huge changes!
Not really, but they bring out the exact point that I am looking to make here. There was no massive re-design involved, no plumbing had to be moved, and the changes that were made, are things we do every single day in this business. Taking a kitchen and living area space and changing up floors, paint colors, cabinets, and lighting gave this space a huge upgrade and was exactly what the homeowners were looking for. Their space is more functional and looks amazing, and in their neighborhood making these changes gives them an opportunity to get some ROI (Return on Investment) should they decide to sell the home.
Are you interested in getting big impact from small changes around your home? Visit www.satintouch.us/contact or call 763-954-0744 to schedule your free estimate today!
Your Minnesota Home Flooring Guide – Choosing the Right Flooring for Minnesota Homes
This is the flooring guide for your Minnesota Home. New flooring can be a major upgrade for your home, and when you make an upgrade like that you want to make sure that you’re getting the best bang for your buck. When you pick out new flooring for your home it can be important to consider where you live. Here in Minnesota we experience some major temperature swings as well as extremely wet and dry conditions.
Your floors are arguably the most hard working surface in your home, they take a beating, and are used all day, every day. Whether you’re walking into your entryway with snowy boots, padding around your basement in socks, or you have kids running around your living room choosing the right flooring for your home is more essential that you may have thought.
Best Flooring For Minnesota Homes
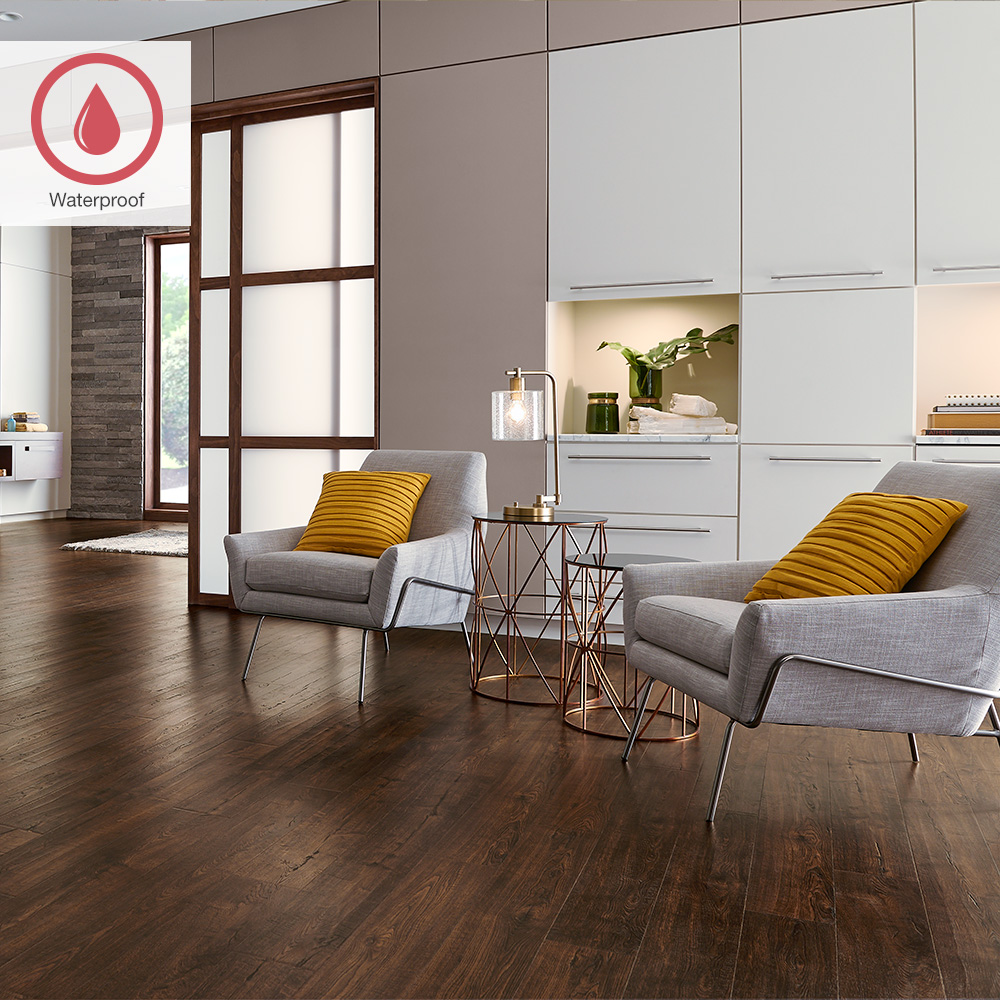
Waterproof
Consider a feature like the waterproof feature of some luxury vinyl plank, this is great for entryways, mudrooms, kitchens, and bathrooms.
Looks
Comfort, safety, and durability should be the number one priority when it comes to picking out flooring, but we all know that looks are important. What’s great is that many flooring companies have thousands of different options for look, texture, pattern, and feel. Consider the look you want for your room when choosing your flooring, as it is one of the most visible pieces in a room.
Cost
As with any project, cost is going to be a major factor, but remember what we said above, your flooring is one of, if not the most used thing in your home so this may be a place to splurge a little so it can last you as long as possible.
Types of Flooring for your Home

Hardwood Flooring
While this is one of the most costly types of floor you can put in your home, a well maintained hardwood floor can last decades, even centuries leaving you with a gorgeous, durable, base for your home. Hardwood flooring generally costs $5-$10 per square foot.
;Resize=(703,703))
Laminate Flooring
This engineered product, a layer of veneer bonded to layers on plywood, uses an image of real wood or stone over a more cost effective material giving you the gorgeous look of wood or stone floors without the upkeep or cost. One thing to note is that while it looks amazing, some people may notice that it does not feel like true wood or stone. Laminate flooring generally costs between $3-$7 per square foot.
Vinyl Flooring
This is a rising trend and one of the most popular types of flooring we install at Satin Touch. With a range of pricing, and installation modes vinyl flooring is made up of a design layer, durable top layer, and cushion layers making this a fashionable, comfortable, and affordable choice. This type of flooring is also waterproof, making it a great choice for basements, kitchens, bathrooms, and more. Vinyl flooring generally costs between $2-$6 per square foot.
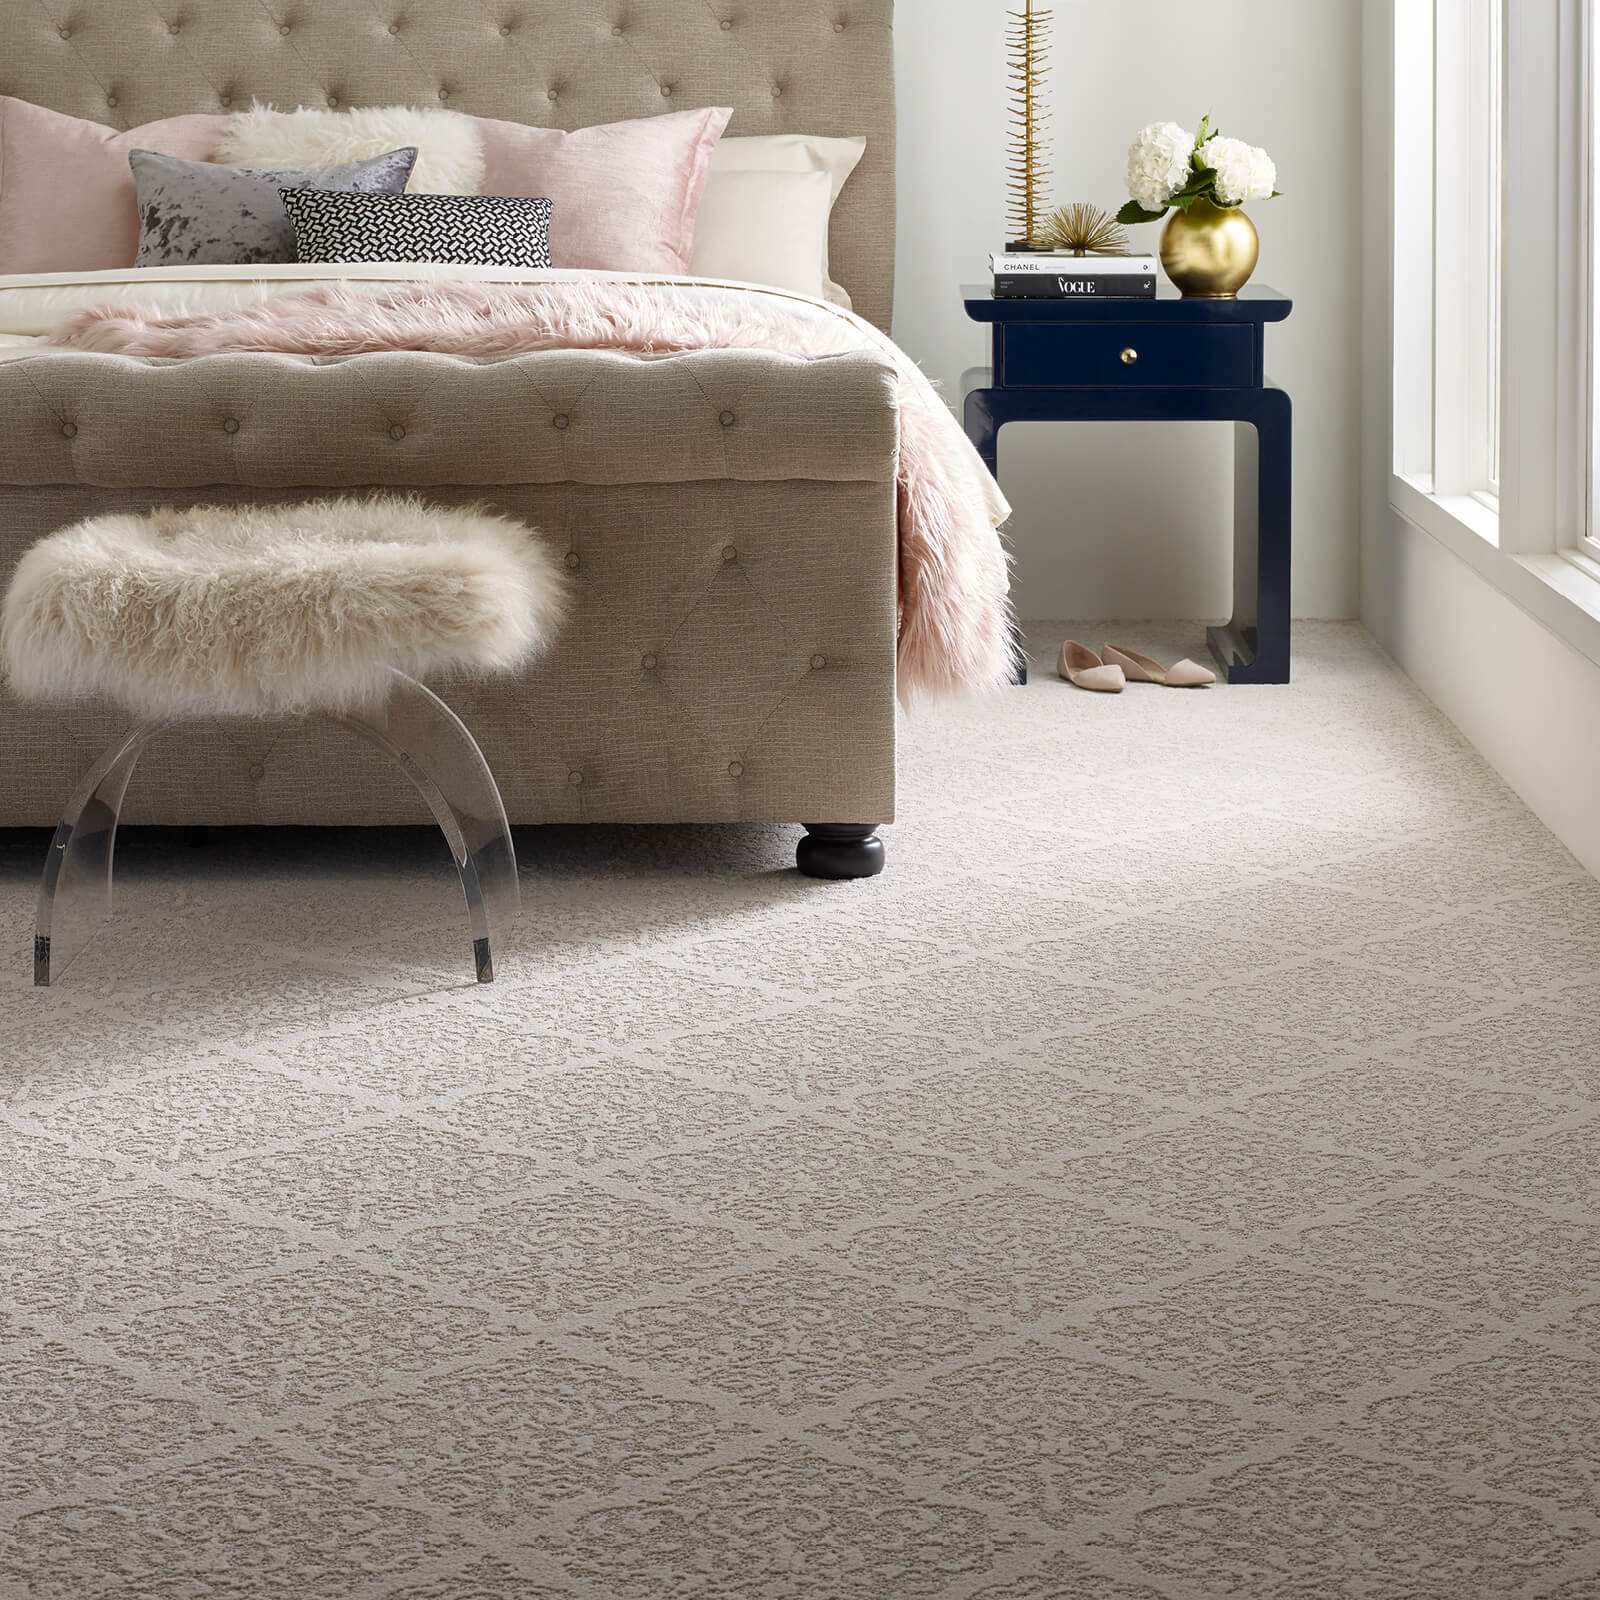
Carpet
With its popularity dwindling, carpet is still a great choice and the biggest flooring category in the U.S. Tufted carpet can come in many lengths, textures, colors, and vibes. Carpet is comfortable, warm, and cost-effective. It’s also easy to install, and is easy to maintain, even boasting stain resistant versions making regular vacuuming your only upkeep. Carpet usually costs between $3-$10 per square foot.
;Resize=(703,703))
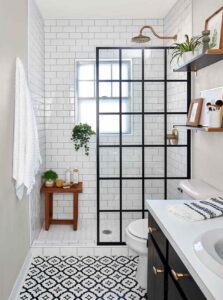
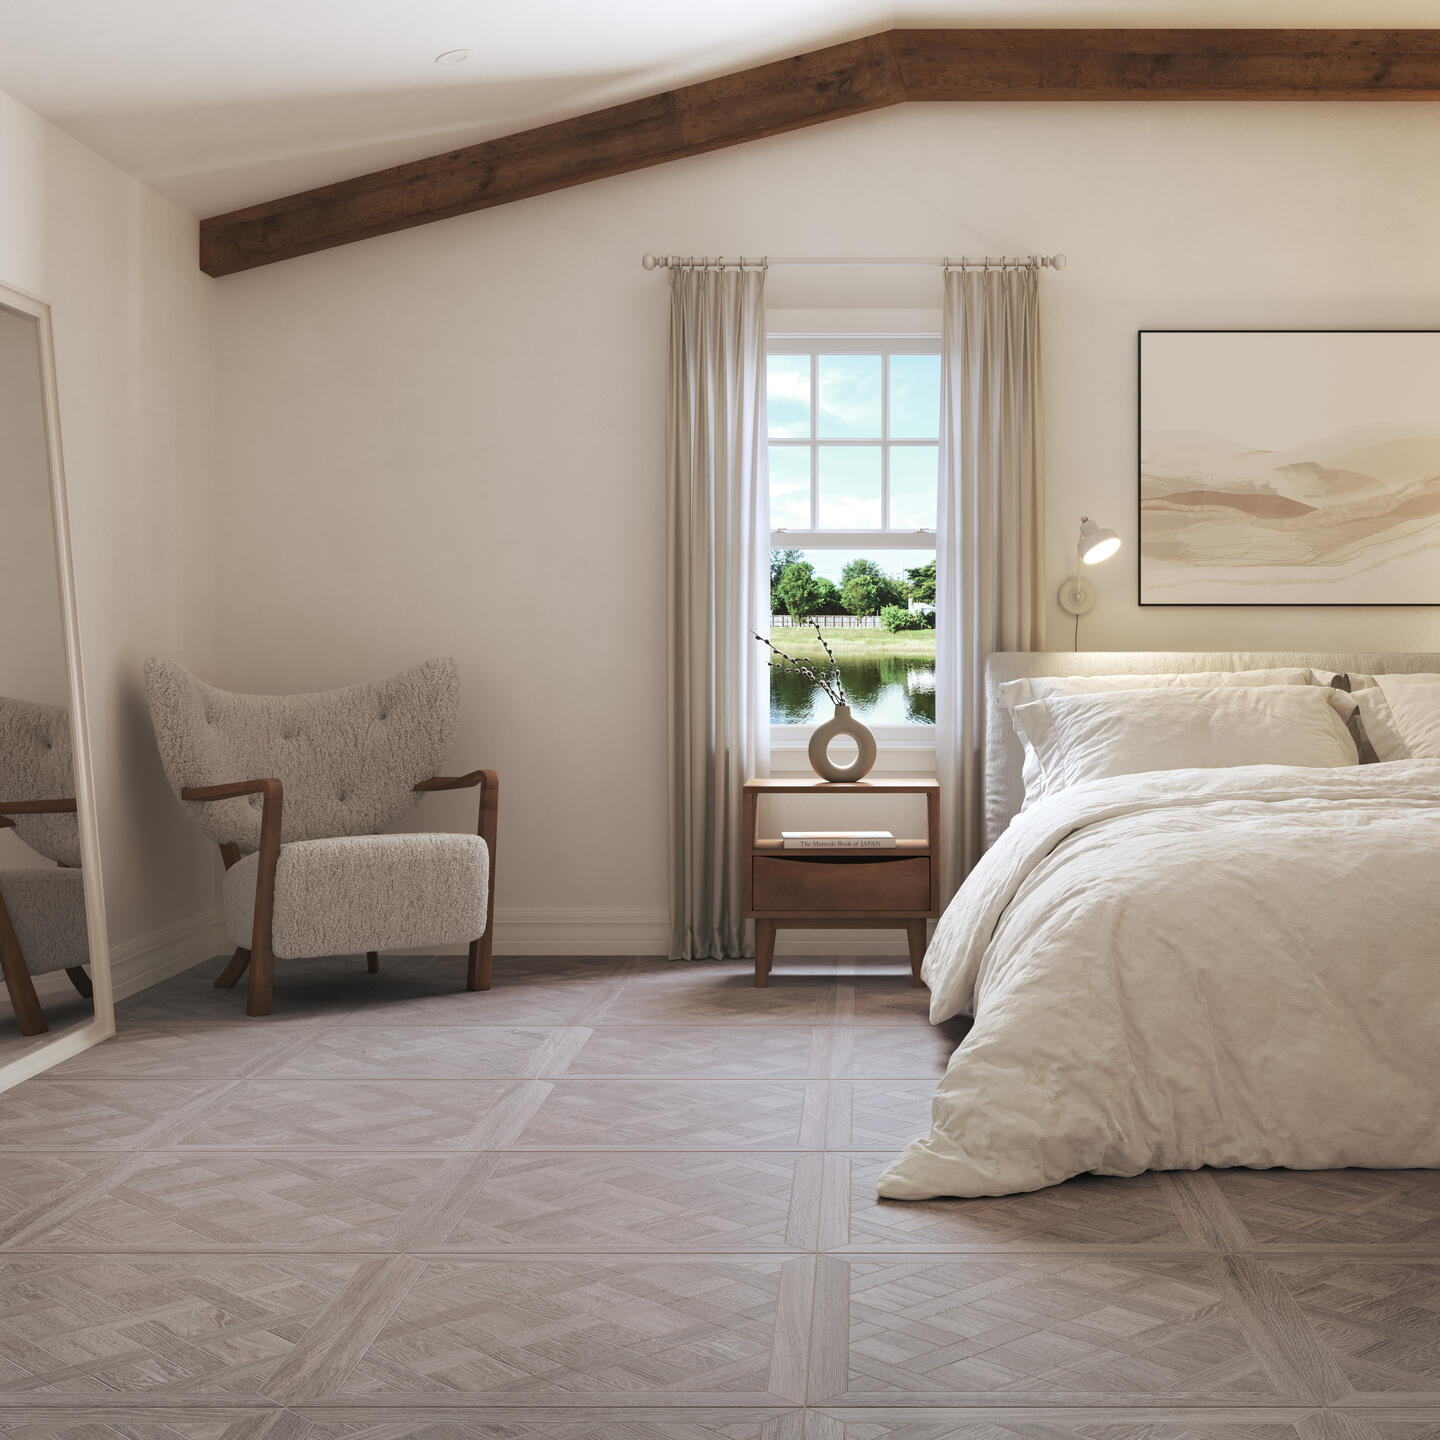
Tile
Tile floors have a wide array of options depending on your budget, style, and needs. Because of the material it is made from, ceramic or porcelain, the design possibilities are nearly endless. It is also extremely hard-wearing, and scratch and dent resistant. The biggest drawback is that it is difficult to install, so having a professional to do this may be great for your sanity. Tile generally costs between $4-$15 per square foot.
How To Choose
How will you use the area you are flooring?
When choosing flooring for a specific room it’s important to consider the use of the room. Bathroom? Consider a waterproof flooring material like vinyl or tile. Bedroom? This is one area where carpet is almost always a winner. Kitchen? A cushioned vinyl or laminate is usually your best bet here.
How often is maintenance required?
The most resilient and versatile flooring mentioned above is hardwood, and its definitely worth the investment to have flooring that you can re-finish and change with the times of the home. There is some maintenance and careful cleaning involved though, so a less time-consuming option would be vinyl (I personally have luxury vinyl plank and carpet throughout my whole house, and it looks great!).
Do you still want some help?
That’s ok! And we’re here to answer any questions you have. Leave a comment below or send us an email. If you’re in Minnesota we would also love to get out and write up a free estimate for whatever project you need for your home.
August Home Checklist – What To Do As You Wrap Up Summer
Laura Gaskill has an awesome list put together for us to transition from summer to the beginning of the school year.
With the transition from summer to the beginning of a new school year (and maybe some back-to-work blues), August can feel like a sudden downshift. Stretch out these last days of summer by squeezing in a few more home projects, savoring simple pleasures and, when the time comes, preparing the house for fall. Pick from these to-dos to create your perfect August plan.
Things to Check Off Your List in an Hour or Less

1. Clean and store summer gear.
Once the last beach day is behind you, take the time to clean out the buckets, shovels and boogie boards so they’re fresh and clean for next year. Toss out cracked or broken toys, and shop end-of-season sales to replace items if needed.
2. Set up a shared family calendar.
Whether you choose a big paper wall calendar or a digital version, having one calendar to rule them all will be a big help come fall. Set up your preferred method now, and record important dates.
3. Clear the way for easy dinners.
A too-packed kitchen (and fridge and pantry) can make meal prep harder than it needs to be. Clear away clutter to create a clean workspace on the counter and remove expired, stale and unwanted food from the pantry, fridge and freezer. Donate unwanted and unexpired foods in their original packaging to a local food pantry.
4. Share your backyard harvest.
Have a glut of tomatoes, squash or other summer produce? Pack up a basket to share with your neighbors, or check the directory at Ample Harvest to locate a food pantry in your area that accepts surplus garden produce.
Tackle These Tasks Over a Weekend
5. Organize family photos.
Have photos from the year’s special moments? Take this opportunity to sort and organize them — back up digital photos with cloud-based storage, and make an album or a book of recent photos. If you would like to display some of your photos but are finding it difficult to choose, put them in a big collage instead or hang them from clothespins or bulldog clips on a wire.
6. Clean carpets and floors.
Sand and garden dirt tracked in over the summer can really take a toll on floors. Vacuum and mop floors, and have area rugs and carpeting professionally cleaned if needed.
7. Get organized for back to school (and work).
Consider what would make this fall run more smoothly for your family: a few extra hooks in the entryway to handle coats and bags? A better workspace or study area? If papers are a constant problem, take the time now to set up a simple filing system and an inbox for each family member.
8. Check emergency kits.
Emergency supplies don’t last forever. Open up your kit and check expiration dates on food and any medications; replace as needed. Don’t have an emergency kit yet? Make this the month you create one.
9. Organize closets.
Before making any new purchases, spend some time assessing what you already have in the closet: Try on clothing, fold and hang up any clothes on the floor, get rid of items you don’t wear and make a list of what you need. Doing this before shopping can help save money and prevent cluttering up your closet.
10. Schedule some relaxation time.
It can be surprisingly hard to relax and simply do nothing, even when you do have free time. I find that the key is not calling it “free time” at all: By planning to do nothing, you are actually giving yourself permission to fully relax. So what do you do during do-nothing time? Sipping from a mug of tea or tall glass of iced tea on the porch with a good book tops my list.
Maintenance and Extras to Budget for This Month
11. Clean and organize the garage.
If you haven’t cleaned out your garage in a while, it’s likely this project will take an entire weekend (or more), so plan accordingly. It helps to think ahead and find out where you can take items (donations, hazardous waste, things to sell) before starting, and get a dumpster if you think you will need it. And if you need help, consider hiring someone to assist you with part or all of the process. Wait until you’ve cleared away the clutter before purchasing new shelving or wall-mounted organizers. You’ll have a better idea of what you need once the decluttering is complete.
12. Finish up outdoor projects.
Make use of the long August days to finish up any outdoor projects you started (or intended to start) over the summer, from cleaning the gutters to adding a new deck.
13. Check your home for signs of pests.
It’s not a pleasant subject, but being proactive when it comes to pests in and around your home is much better than trying to solve a pest problem that has gotten out of hand. The Environmental Protection Agency recommends taking preventive measures such as removing sources of food, water and shelter, and closing off places where pests can enter and hide. If you do need to use pesticides, choose the lowest-risk product first, and use according to the directions. If you hire a pest control pro, ask him or her to use bait, and crack and crevice control when possible; fogging should be a last resort.
Paring Down Your Kitchen While Your Prepare For A Remodel

One task you’ll likely face when embarking on a kitchen remodel will be packing and temporarily relocating your kitchen items. This is a great opportunity to edit your belongings and fill your new kitchen with only the things you love and need.
Patricia Lee recommends starting the decluttering and packing process as early as possible. You might be surprised by how much can be stored in a kitchen, even a small one. It might take a significant amount of time just to pull every item out of the cabinets, and then even more time to decide its fate.
Set Aside What You’ll Need During the Remodel
If you’ll be staying at your home while your kitchen is being remodeled, you might still want to have access to some everyday items, such as a coffee maker, a toaster, a microwave, basic utensils, dinnerware and cups.
You most likely will be hand-washing items if you don’t have access to a dishwasher, and you might even be washing them in a bathroom sink. Therefore, keep things simple: Consider keeping out only one, or at most two, of each necessary tableware item per person, cleaning between each use.
If you don’t want to fuss with washing, consider using recyclable or compostable disposables. Now would be an ideal time to use up any mismatched party plates, cups and napkins collected from past events.
Plan How You’ll Store Your Kitchen Contents During Construction
If your remodel time is expected to be short, such as two to three weeks, and you don’t mind the temporary imposition, you can store your kitchen contents in another room, such as the dining room, without much additional packaging.
If your remodel is anticipated to be longer than one month, then I recommend packing and storing items in moving boxes. This will keep your items clean and safe, and you can stack the boxes inconspicuously and out of the way.
Kitchen items can be heavy, so consider using only small and medium-size, heavy-duty boxes if possible. Packing paper also will be useful for wrapping delicate, fragile items like wineglasses and for filling in gaps in the boxes so things don’t jiggle and knock against one another. Remember to label your boxes so you won’t be opening mystery boxes when it’s time to unpack.
Purge and Pack by Category
To remain organized, try to work with one category at a time. Pull out items and lay them out on the counter so you can see everything you own and get a better sense of how much you actually need.
Dinnerware. If you have more than one set of dinnerware, use this time to lose any sets you aren’t using or don’t love anymore. In the sets you want to keep, check for chips and cracks and determine if those pieces are worth keeping and usable. Chips and cracked glaze that isn’t intentional can expose your food to the material under the glaze, which might or might not be food safe. Additionally, cracked glaze can potentially harbor bacteria if not sanitized properly.
Consider breaking up a set if there are pieces you never use. For example, if you always use your mugs instead of a cup and saucer, you might want to consider donating the latter.
If you have fine china that you aren’t using, consider what it means to you. If it has sentimental value and you don’t want to give it up, be sure to package and store it properly. You might want to store the china somewhere besides the kitchen and reserve your kitchen for everyday items.
If you aren’t using the china because you don’t like it, understand why you’re keeping it. If it makes more sense to relieve yourself of it, pass it along to someone who will appreciate it more.
Serveware and entertaining pieces. When my husband and I got married, we purchased and registered for serveware based on what we thought our entertaining needs would be. Lots of those reasons were theoretical and idealistic.
After a few years of marriage, we figured out our groove and what would and wouldn’t work for us. Evaluate how you entertain and be sure to edit out excess items that don’t support your hosting style.
Mugs and promotional cups. These can be surprisingly difficult to cull, since they usually reflect some kind of sentiment, such as a place where you’ve vacationed, a company you worked for, photos of loved ones or special events you’ve attended.
Ask yourself which mugs you actually love and use, and which ones you’re keeping just because they seem sentimental. If you collect series of mugs, you might want to consider minimizing your collection by selecting just your favorites.
Storage containers. Do you have many mismatched storage containers and a stockpile of takeout containers? Start by identifying which containers don’t have matching parts. Just like socks in a dryer, storage container mates often seem to disappear. Toss any containers or lids without a mate.
Many plastic takeout containers are designed for single use only and might not be food-safe for prolonged reuse. Look at the recycling code on the bottom of the container and research the plastic’s characteristics to determine if you feel comfortable reusing it. I recommend recycling any containers that are not designed for multiple uses.
If your family’s needs have changed — for instance, children have moved out — you might be able to reduce the quantity of containers needed. Also consider getting rid of any your kids have outgrown, such as too-small snack containers.
Small appliances and gadgets. So many appliances and gadgets claim to make prepping and cooking easier. Many of them work as advertised, but do they work for you? Review yours and give away any you don’t use. Try not to think about whether the item might be useful in the future; think more about whether it is useful to you now. Be sure you actually like using the item and not just the idea of using it.
Extras. Take stock of how many kitchen tools you have and how many you use and need. Review the condition of each item. Pare down the excesses and toss defective items such as melted spatulas, warped scissors and peeling nonstick pans.
Be Thoughtful About What You Keep
6 Quick Tips for Your Home Renovation
Renovating your home can be a costly and time-consuming process, but there are some simple DIY projects you can do that can make a big impact on the look and feel of your home. Here are six DIY tips for home renovations that are affordable and easy to do.
1) Paint your cabinets: Repainting cabinets is a budget-friendly way to give your kitchen or bathroom a fresh, updated look without the cost of replacing them. You can choose any color that complements your space and gives it a new feel. Make sure to clean and sand the surface before applying the paint to ensure it adheres properly.
2) Install new hardware: Swapping out old hardware, such as handles and knobs, can make a big impact on the overall look of a room. Updating hardware is an easy DIY project that can be done in a few hours with a screwdriver and some hardware from your local home improvement store.
3) Add a backsplash: A new backsplash can add color and texture to a kitchen or bathroom without a major renovation. There are a variety of options available, from peel-and-stick tiles to traditional ceramic tiles, that can be easily installed by a DIYer.
4) Replace light fixtures: Updating outdated light fixtures can make a room feel more modern and stylish. You can replace old fixtures with new ones that fit your style and budget. Make sure to turn off the power before installing new fixtures and follow the manufacturer’s instructions carefully.
5) Add a fresh coat of paint: A new coat of paint can transform a room and give it new life. Choose a color that complements your furniture and decor and gives the room a fresh, new feel. Make sure to prep the surface properly by cleaning, sanding, and priming before applying the paint.

6) Refinish hardwood floors: If you have hardwood floors that are in good condition but look dull or scratched, refinishing them can make them look like new. You can rent a floor sander from your local home improvement store and follow the manufacturer’s instructions to refinish your floors. This is a more time-consuming DIY project, but the results can be stunning.
These six DIY tips for home renovations are affordable and easy to do, and they can make a big impact on the look and feel of your home. With a little time and effort, you can transform your space into a beautiful and updated living area.
Kitchen Design Trends in 2023 (Home Design Trends Part 1)
Mitchell Parker rounded up a list of design trends. Here are the first 12 of 35 where we take a look at kitchen trends. Look for bathroom trends in part 2.
They say change is the only constant in life. Lately that notion feels all too true. But in an ever-changing world, many people are seeking stability — and joy — right at home. And in turn, a lot of homeowners are emerging from the last couple of trying years with renewed vigor for creating lively homes full of color, pattern, texture and optimism.
To capture some of that energy, we’ve gathered 35 home design and remodeling trends that homeowners and pros are excited about for the coming year. See if any inspire a change to your own home. And from now on, maybe we can put a positive spin on change and just call it progress.
1. Modern Rustic Style
A few themes weave throughout these 2023 design trends. Among them are the use of natural materials and a general feeling of warmth. You’ll find both in a modern rustic style we’re seeing show up in kitchens.
Think natural wood cabinets and other wood details paired with natural stone countertops and backsplashes, with a few modern elements thrown in.
2. Elegant Farmhouse Style
Another style showing up in kitchens is a more elegant take on the modern-farmhouse style that’s been popular in recent years. You’ll find many of the same elements, such as Shaker-style cabinets, apron-front sinks and furniture-style islands and cabinets. But you’ll also notice the use of dramatic cabinet colors, oversize range hoods and slab stone backsplashes.
3. Modern Spanish Style
Meanwhile, an updated approach to Spanish style is also taking hold. Terra-cotta floor tile, an arched range hood with a hand-painted terra cotta tile backsplash and a custom island with an end-grain walnut butcher block counter and spindle leg detail update old-world style with a contemporary twist.
4. Warm and Soft Palettes
While some homeowners are desiring more bold color in their kitchens, many are looking for warm and soft styles that elicit a restful, relaxing atmosphere. To do that, designers are embracing greige or off-white cabinets, light woods, subtle patterns and warm bronze and brass finishes.
5. Natural Materials
Natural materials are always in style, but lately they seem to have hit a high point in popularity. In particular, homeowners are installing quartzite and other natural stone countertops, as well as marble tile and wood cabinets and vanities, especially white oak. Some designers say the surge of interest in natural materials is a result of some homeowners rethinking man-made materials like engineered quartz that have dominated homes in recent years and instead gravitating to natural materials that add character and authenticity to a space.
6. Blue Features
White and gray are by far the most popular colors used in kitchens. But when homeowners stray from that palette, they often choose blue. In fact, when a homeowner chooses to go with an island color that contrasts with the surrounding cabinets, more than a quarter (26%) will select blue, according to Houzz research.
7. Green Cabinets
In addition to blue, green is quickly gaining favor in kitchens, especially for cabinets. Both light and dark greens work well with wood details and brass finishes, creating a warm, rich look.
8. Wood Cabinets
Wood cabinets are trending along with the surge in natural materials. White oak seems to be dominating the choices, but walnut is also popular.
9. Creative Island Seating
Casual seating is just one of many appeals of a kitchen island. While the traditional seating arrangement has typically been a row of stools on one side facing the cooking area, some homeowners are seeking alternative setups to accommodate a variety of needs, such as the ability to sit face to face with guests or sit at a standard dining table height. As a result, we’re seeing a lot of islands with creative seating arrangements, such as two-tiered designs with seating for 10 and dropped-down or raised-up areas for various needs.
10. Commercial-Style Faucets
Many home chefs are gravitating to commercial-style kitchen features to better tackle cooking tasks. In response, many faucet brands have launched new commercial-style faucet lines that blend industrial and modern looks.
11. Workstation Sinks
Workstation sinks are also part of the drift toward commercial-style features. These have been around for many years now, but manufacturers have caught up to the demand and now offer all kinds of sizes, styles and accessories for things like chopping, straining, drying and other functions.
12. Induction Cooktops
It seems these days everyone knows someone who’s jumped on the induction cooktop bandwagon. For the uninitiated, this method uses electricity to heat pots and pans directly through magnetic induction. These cooktops work with many types of pots and pans — such as stainless steel, cast iron and porcelain enamel on metal — but they don’t work on all, so you might have to replace some of your cookware. If a magnet sticks firmly on the bottom of a pot or pan, the piece will work with induction.
7 Ways to Make Your Living Room Sociable
Jo Simmons shares 7 tips to make your living room more sociable.
Living rooms can sometimes be overlooked now that so much of our at-home socializing takes place around a table in an open-plan kitchen space, but nothing beats being able to sit comfortably with friends and family, to talk, enjoy a drink or watch a movie.
Comfort is key to creating a relaxed, sociable living space, so concentrate on getting the style and position of the seating right, then build up from there, adding fun touches, handy side tables and just the right lighting.
1. Provide Different Types of Seating
If sociable means entertaining friends and family of all ages, work in more than one seating type. While squishy sofas may suit those who want to kick off their shoes and snuggle down, older visitors may prefer the support of an upright chair. Children may prefer floor cushions or stools.
2. Light a Fire
Humans have gathered around fires for millennia, to eat, talk, warm up and feel safe. Lighting one in your living room produces the same sense of sociability and comfort.
3. Face Each Other
Sofas that face each other, rather than a TV, promote conversation. Make sure they’re positioned close enough together that you and your guest aren’t shouting at each other across the divide.
Just because you’re squeezing in two sofas doesn’t mean you need to scrimp on size either. In this room, Beth Dadswell of Imperfect Interiors positioned two sizable couches opposite each other, then replaced an ottoman with a glass coffee table to make the rest of the space feel lighter.
4. Provide Several Surfaces
Tables on which you can pop a mug, glass or bowl of snacks are essential to a sociable living space.
5. Consider a Corner Sofa
Nothing says sociable like a corner couch. This flexible, space-efficient form of seating works particularly well for big families with modest living rooms. It provides a large expanse of comfy seating, which encourages teens to lounge and toddlers to get cozy.
To make this type of seating even more functional, consider a coffee table that can doubles as a footstool. The extra surface will provide even more opportunities for everyone to stretch out.
6. Get the Lighting Right
A sociable living room needs lighting that creates a warm atmosphere, but without being too dim. You want to be able to see your guests, after all. Weave in a flexible mix of lamps and ceiling lights to create a soft, layered look.
7. Install Sliding Doors
In this home, Nick Taylor of IMBY3 Architecture & Design designed sliding barn doors between the kitchen and living space. When closed, the living room feels cozy and intimate. …